Need to export your active employees into your payroll system? Maybe you want to audit manager logins or track hiring activity across your stores? Or maybe you want more information on your applicant sourcing or EEOC compliance. Whatever it is, we're here to help!
HigherMe offers several types of customizable exports that you can keep for your own records or import into other systems like an HRIS or payroll platform. To get started, visit your Exports page!
| 📂 Preset exports |
-
Active employees: This export lists every employee that was successfully onboarded within a specified date range, as well as all of their key information (displayed in columns within the report). Note: You will only see this export option if you subscribe to our Onboarding service.
-
Applicants: This export lists every applicant that applied within a specified date range. To narrow your list, filter by application status: for example, filter by "hired" to show only hired applicants. You can also filter by job and store location.
-
Application sourcing: This export lists every applicant that applied within a specific date range and gives you a snapshot of their application progress. For example, if you run this report for the month of August, it will list every applicant who applied in August (only) as well as their current application status.
-
Location and job statistics: This export shows you all hiring activity made during a specific date range. For example, if you run this report for the month of August, it will show you all applicant status updates made during the month of August, regardless of when those applicants actually applied. This lets you track hiring activity across your company.
-
Manager logins: This export shows you all manager log-in activity within a specific date range, including managers who have never logged in.
-
Boosting: Get a performance report for your job boost campaigns. Individual campaign data can also be found by clicking the 📢 icon next to a boosted job on your Jobs page.
|
✍️ Customizing an export
|
- First, set a date range for the export you'd like to run.
- If you'd like a more focused export, select a specific location or job you'd like to analyze.
- Some exports offer additional filter options, like "Application status" or "State." Select these as needed from the Add filter dropdown.
- Next, take a look at your Fields. Fields correspond to the columns in your export. You'll see a list of preset fields – rename or reorder these as needed to control the format of your export.
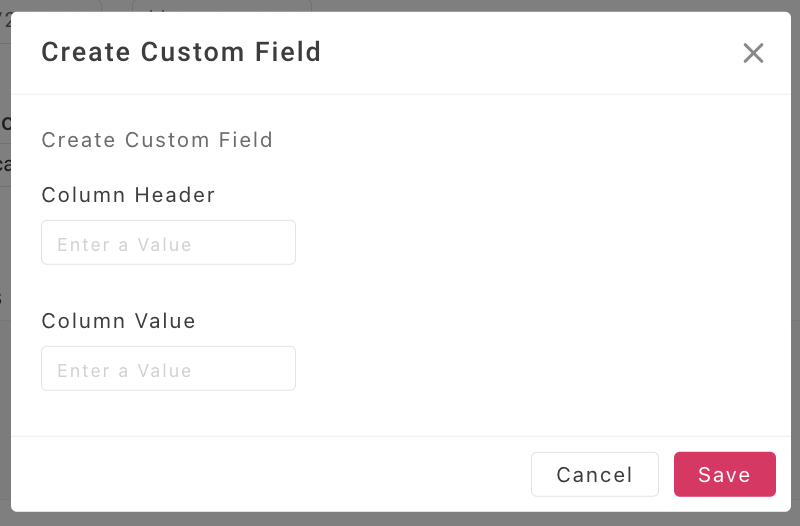
- Not seeing a field you want to include? Create a custom field by clicking on the blue +Custom field button above your list of preset fields.
For example, in the Column header field, you could enter "Middle Initial," then click Save.
|
 |
 |
 |
- Under File export format, select the type of file you want your export to generate.
- Click Export and you're ready to go!
You'll receive an email shortly letting you know that your export file is ready to download. You'll find it in your View history tab.
|
| 🕙 Export history |
| All exports run on your account will automatically populate in your View history tab for future reference. |
| 🗂️ Saved exports |
| Using custom fields or filters? Save your settings as a template so you can easily re-run the same export in the future! You can also set up a recurring export via your Saved exports tab. |